Tutorial for
using my Zazzlit Gadget for profit
Second
method—for blogs and websites
Page: <
1
2
3
4
5
>
This gadget
was created using
the
second method, the one desribed below.
Note the blue skin around the content—you don't get this with
the first method.
If you followed the first page and you're happy
with the gadget you've now got on your blog,
there's no need to continue here. Instead move straight on to seeing some
examples of it in use.
Note
that the examples have to use the second method, the one
for placing Zazzlit on a site rather than a blogger blog (what
you're viewing right now is a site, not a blog!)
What does this approach do?
There are a couple of things that this second
method will do for you that the first one doesn't.
- put a skin around the gadget like the
blue one above
- give you the javascript code to paste directly
where you want it,
for example
- in a blogger blog as a new html/javascript
gadget
- in a blogger ftp / classic template blog
- on your web site
- anywhere that allows you to paste javascript
To do this, you're going to:
- follow a link I'll give you
- paste in a Zazzle RSS feed string
- generate and copy the code
you'll then be ready to paste it and see it in
action!
Creating your first
Ok, enough lead-up, let's create the first one
using this approach.
Let's assume you want to pick
out just fun (qs=fun) mugs (pt=168) from across all of Zazzle, ordered
by popularity
(st=popularity) in the last 30 days (sp=30).
The parameters are more
fully described here.
Copy this (the
Zazzle RSS feed search—don't forget to change the associate
id to yours):
Now follow this link...
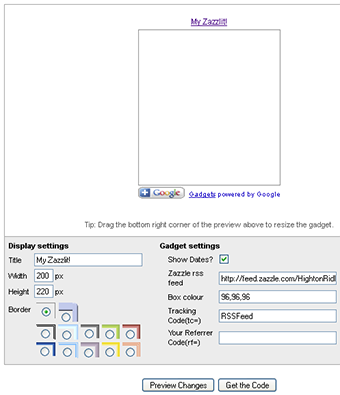
You'll see this
Paste into the "Zazzle rss feed" box what
you've just copied...
Note that you don't see any gadget content (at
least, I don't).
But no worries, all you're after is the
javascript code and you'll get that in just a second.
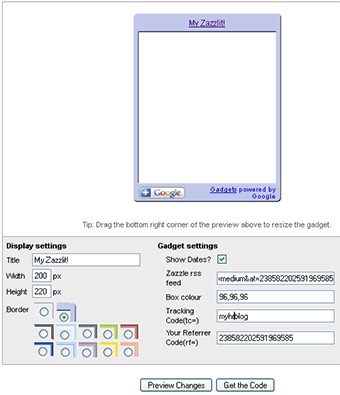
Almost done...
Select the thick blue border and click the "Get
the code" button".
Copy the code you're given.
Now that you've got the javascript, go and paste
it somewhere!
If you want it on a blogger blog get to your
layout->elements page and add a new gadget of type html/javascript and
just paste in what you copied from above.
This is what it looks like
In case you haven't got somewhere to paste it into
right now, I followed the instructions above and pasted it in here, so
you can see what it looks like in action (I've also wrapped it in a
<div> tag with a width of 225px to make it look nice - without
it, there's a small gap between the content and the right hand frame
edge when you use a gadget width of 200px as I have here).
If you
followed the steps above, this is what you'll get.
Image-based borders
No control over gadget skin text colour
Unfortunately Google doesn't give a way to change
the colour of the title link text or the "Gadget powered
by Google" text at the bottom (at least, I don't know how!).
If they clash with
your colour scheme, one way around it is to use image-based borders.
This gadget
was created using image borders that I modified from the Google
originals. See below for how to do this for your gadget.
An image-based border is referenced by a
URL with this format http://hostname/some/path/ (must end in a
slash). Such borders use a set of 8 images:
To make it easy for you to
downlad them, I've linked the above image names to the default set,
held in http://www.google.com/ig/images/..., for example,
http://www.google.com/ig/images/br.gif,
Download them and change them to suit the colour
scheme of where you are putting the gadget.
Seeing as the default one is sky blue, I thought
I'd do one in pink, just for gender balance!
Brew Time...
Ok, that's the second method under your belt. Now
you should be ready for some more examples of using the gadget.
As a matter of fact, I think you've done so well,
you can go and get a cup of your favourite brew and a cup cake.
You are on page 2. Next
page: Part two: Getting stuck
in—using it in anger
Page: <
1
2
3
4
5
>
Please
share / tell your friends about the Zazzlit Gadget 


